
As I get further into this beautiful obsession of mine called Wildlife Photography I have begun to see or I guess look at things differently. I seem to focus less on my subject but focus more on the surrounds; the background, the foreground and most importantly the light. Starting off in Wildlife Photography it is so important to understand your subjects; Where to find them, what environments they hang out in, what time of year is best to see them and what behaviors they exhibit to help you in photographing them. But for me I always strive to take things one step further. I want to capture my subjects in a way few people get to see them or at least change the way you view them. I want to represent them in a beautiful and magical way in hopes of sharing with all of you why I am so passionate about Wildlife Photography.
A month again it was reported by a local birder that a Greater Yellowlegs and some Lesser Yellowlegs had been showing up at Virginia Lake in St. Johns, NL. These birds are not uncommon to the island of Newfoundland and can be found in and around many of the lakes, ponds and shorelines throughout the island during shorebird season. But what got me excited about the fact that they were there was the opportunity to photography them in some beautiful early morning light and to also test out various lighting conditions.
The past two weekends I have spent each morning at the lake from before sunrise to about 3 hours after sunrise. I have spent very little time at this location before and boy was it an eye opening experience to what this location has to offer. The location and position of the lake allowed for the first rays of morning light to spill over the landscape making for ideal conditions. Here are a few IPhone images taken during of the mornings and you can clearly see how beautiful the light can be.


After capturing thousands of images I wanted to share with all of you some of my favorites and explain each of the lighting conditions which in turn I hope will open your eyes to trying new angles and new lighting. Many of use tend to stick to the traditional lighting setup with the sun at our backs lighting up the subject in front of us. As great as this light maybe in capturing great detail in our subjects I feel many of us are missing out on the magical light of back-lighting or side lighting our subjects.
So let’s dive in and have a look at some lighting
Overcast or Muted Light
These first images are well..actually taken with very little light. It was taken on an overcast morning on my first outing to the lake (I actually took out a buddy of mine Russ Lynch how is just starting to spark an interest in Wildlife Photography). We had thick clouds all around us but what this did provide was an opportunity to shoot at any angle since there would be no harsh light or shadows to worry about on our subject. I generally dislike overcast days for photographing waterfowl or shorebirds since you will often be left with a grey metallic reflection in the surrounding water unless the body of water you are photographing in is completely surrounded by foliage that is providing a nice colorful reflection. Lucky enough the shoreline where we were setup provided those conditions.
So here are two images from that day showing nice even soft light. As mentioned this light is great to show all the feather details and to not have to worry about shadows or hot spots on your subject from blown out highlights. It’s a great light to work with(especially for song birds or in thick forest areas) but in the end it is just that…nice even light..nothing more nothing less


After such a great morning and actually coming away with some keepers I still wanted to capture some images in nice warm light. So I returned the following morning since the weather station said it would be clear skies. This gave me a chance to really test out some early morning light
Direct Light
Arriving 15 mins before sunrise I setup right at the edge of the water. I positioned myself with the classic setup with the sun at my back taking full advantage of those first rays of light. Capturing those first hints of warm light on your subject in this classic light setup really helps add some interest to the image

I was super happy to have captured these two images as its the first time I had been able to capture full frame images of a Lesser Yellowlegs.

Note: you may find these images push the limits of your camera and your technique as they will often be shot at lower shutter speeds and higher ISO since the light still is very low on the horizon and very soft only providing enough light to warm your subject.
Side Lighting
In the following image A Greater Yellowlegs moved further to my right and more parallel to the sun providing some nice side light. This type of lighting creates a more contrast style lighting where head position is key since the side of your subject will be in complete shadow while the other is light by the sun. Here you have to wait for those moments when your subject turns ever so slightly in the opposite direction of the sun which will light up the face and hopefully give that nice catch light in the eye.

Here you can see an example of when the head position is wrong and the side of the face now in your direction is shadowed.

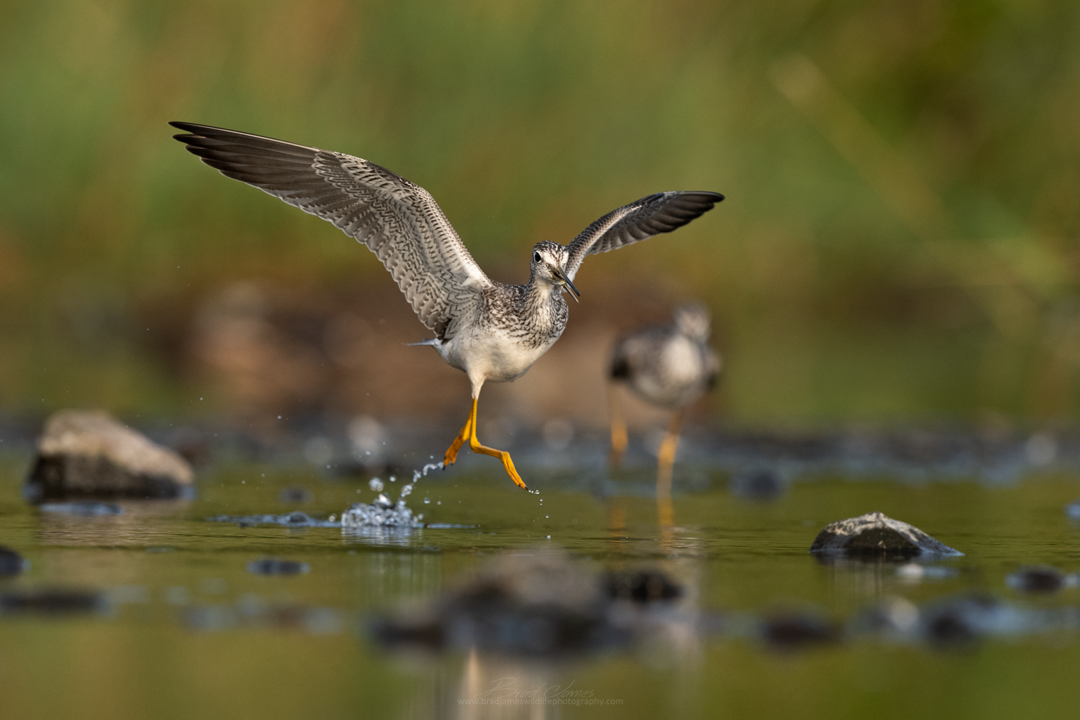
On clear days the light will get intense fast so take full advantage of it while you can. Once the light gets intense and your shutter speed increase it’s a great time to focus in on some action shots or in-flight opportunities. It is key during these times to make sure the sun is at your back and directly lighting your subject as it will limit the chance of harsh shadows casting across your subject.
Lucky for me on the second day a few other Greater and Lesser Yellowlegs made appearances sparking a battle between one Greater Yellowlegs and the rest over the main fishing spot. This provided some great in-flight and actions shots.


Now on to what I feel is much more magical light….
Back lighting
This type of lighting is when the sun is positioned directly behind your subject. In order to make full use of this light and to show case its full potential you need to have a dark background and preferably darkish foreground. Why is that you ask? Well, because we are focusing on exposing for our subject we have to overexpose our image which if we didn’t have a dark background or foreground we would run the risk of completely blowing it out. Leaving us with more of a high key image (subject on white basically). Back-lighting can also be an opportunity to capture silhouette images where you exposure for your highlights making your subject completely black. I felt this area wasn’t the most ideal location for this type of image so I stuck with exposing for my subject. More specially the images you see below would fall under a type of Back lighting called Rim lighting where a portion or all of the edges around the subject are highlighted.
Since the main Greater Yellowlegs was driving the rest of the shorebirds to one corner of the lake where the sun was behind them it provided a great opportunity to do some back lighting. The sun during this time was just above the trees (which was about an hour and a half after sunrise). The distant foliage below those trees was my background and since they were in shade it provide the perfect setting. Keep in mind that the height of the sun from the horizon will give a lesser or more dramatic effect with this light. As mentioned my sun that morning was about mid-morning light and ideally I would have wanted the sun lower to the horizon but the tall trees behind my subjects prevented that. The first image is a nice clean portrait where you can see how the back light highlights any feathers sticking off from your subject giving them a nice translucent feel.
This type of lighting is also a great time to capturing preening or shacking shots to highlight those raised or out stretched feathers

Bathing shots are great as well since each tiny droplet of water will be enhanced.

During this type of light you will often capture some very interesting bokeh in both your foreground and background. This is often the result of the light reflecting off particles in the water or wet rocks/surfaces in your foreground.
In order to achieve this effect my camera and lens where laid completely on the ground (no tripod not even hand held). This allowed for a super low angle and for the wet rocks to become completely out of focus.
Here are a few other images taken in the same setting.


These images to me truly provide a unique feel and look to your subject. Various features of your subject become more prominent and highlighted when direct or even light will not produce the same results.
I hope you have found this post and its illustrations of value and helpful in understanding the advantages of trying different lighting conditions. Hopefully it will open your eyes to thinking more about your surroundings when out in the field and how best to use them. In my next blog post I will speak a little more about location and its importance in capturing beautiful images of your subjects