
As I head into my 10th year of doing Wildlife Photography as a hobby I feel I have gained a lot of knowledge from the field and from many other photographers out there. Though this is only a hobby for me I take it very seriously and most of my free time is spent thinking about photography, trying to improve my craft and also planning out my next outing. With the knowledge I have gained I want to put together what I feel are my top 5 Wildlife Photography tips that have helped dramatically change the type of images I capture and have drastically improved my images. So lets get started:
Number 1 - Low POV (point of view) - I am sure many of you have heard me speak about this in the past and you have probably heard many other photographers talk about this, and for good reason. This is by far one of the biggest changes I feel someone can make to their photographing that cost nothing and is “easy” to implement. I put easy in quotes as shooting in the laying position isn’t always easy..you will often get very dirty, your neck will often hurt and especially your back but a low shooting angle completely transforms your images.

And when I mean low, I mean laying on your stomach on the ground(of course this is all relative to the location you are shooting but I mean get as low as you can to your subject).

I have heard so many beginner photographer say “well I was low I was sitting on my butt or I was knelt down” and one might think this is low enough but often times it is not..I actually did a blog post showing the difference each height makes to the image you will capture which you can check out here if you haven’t seen it yet A Game Changer
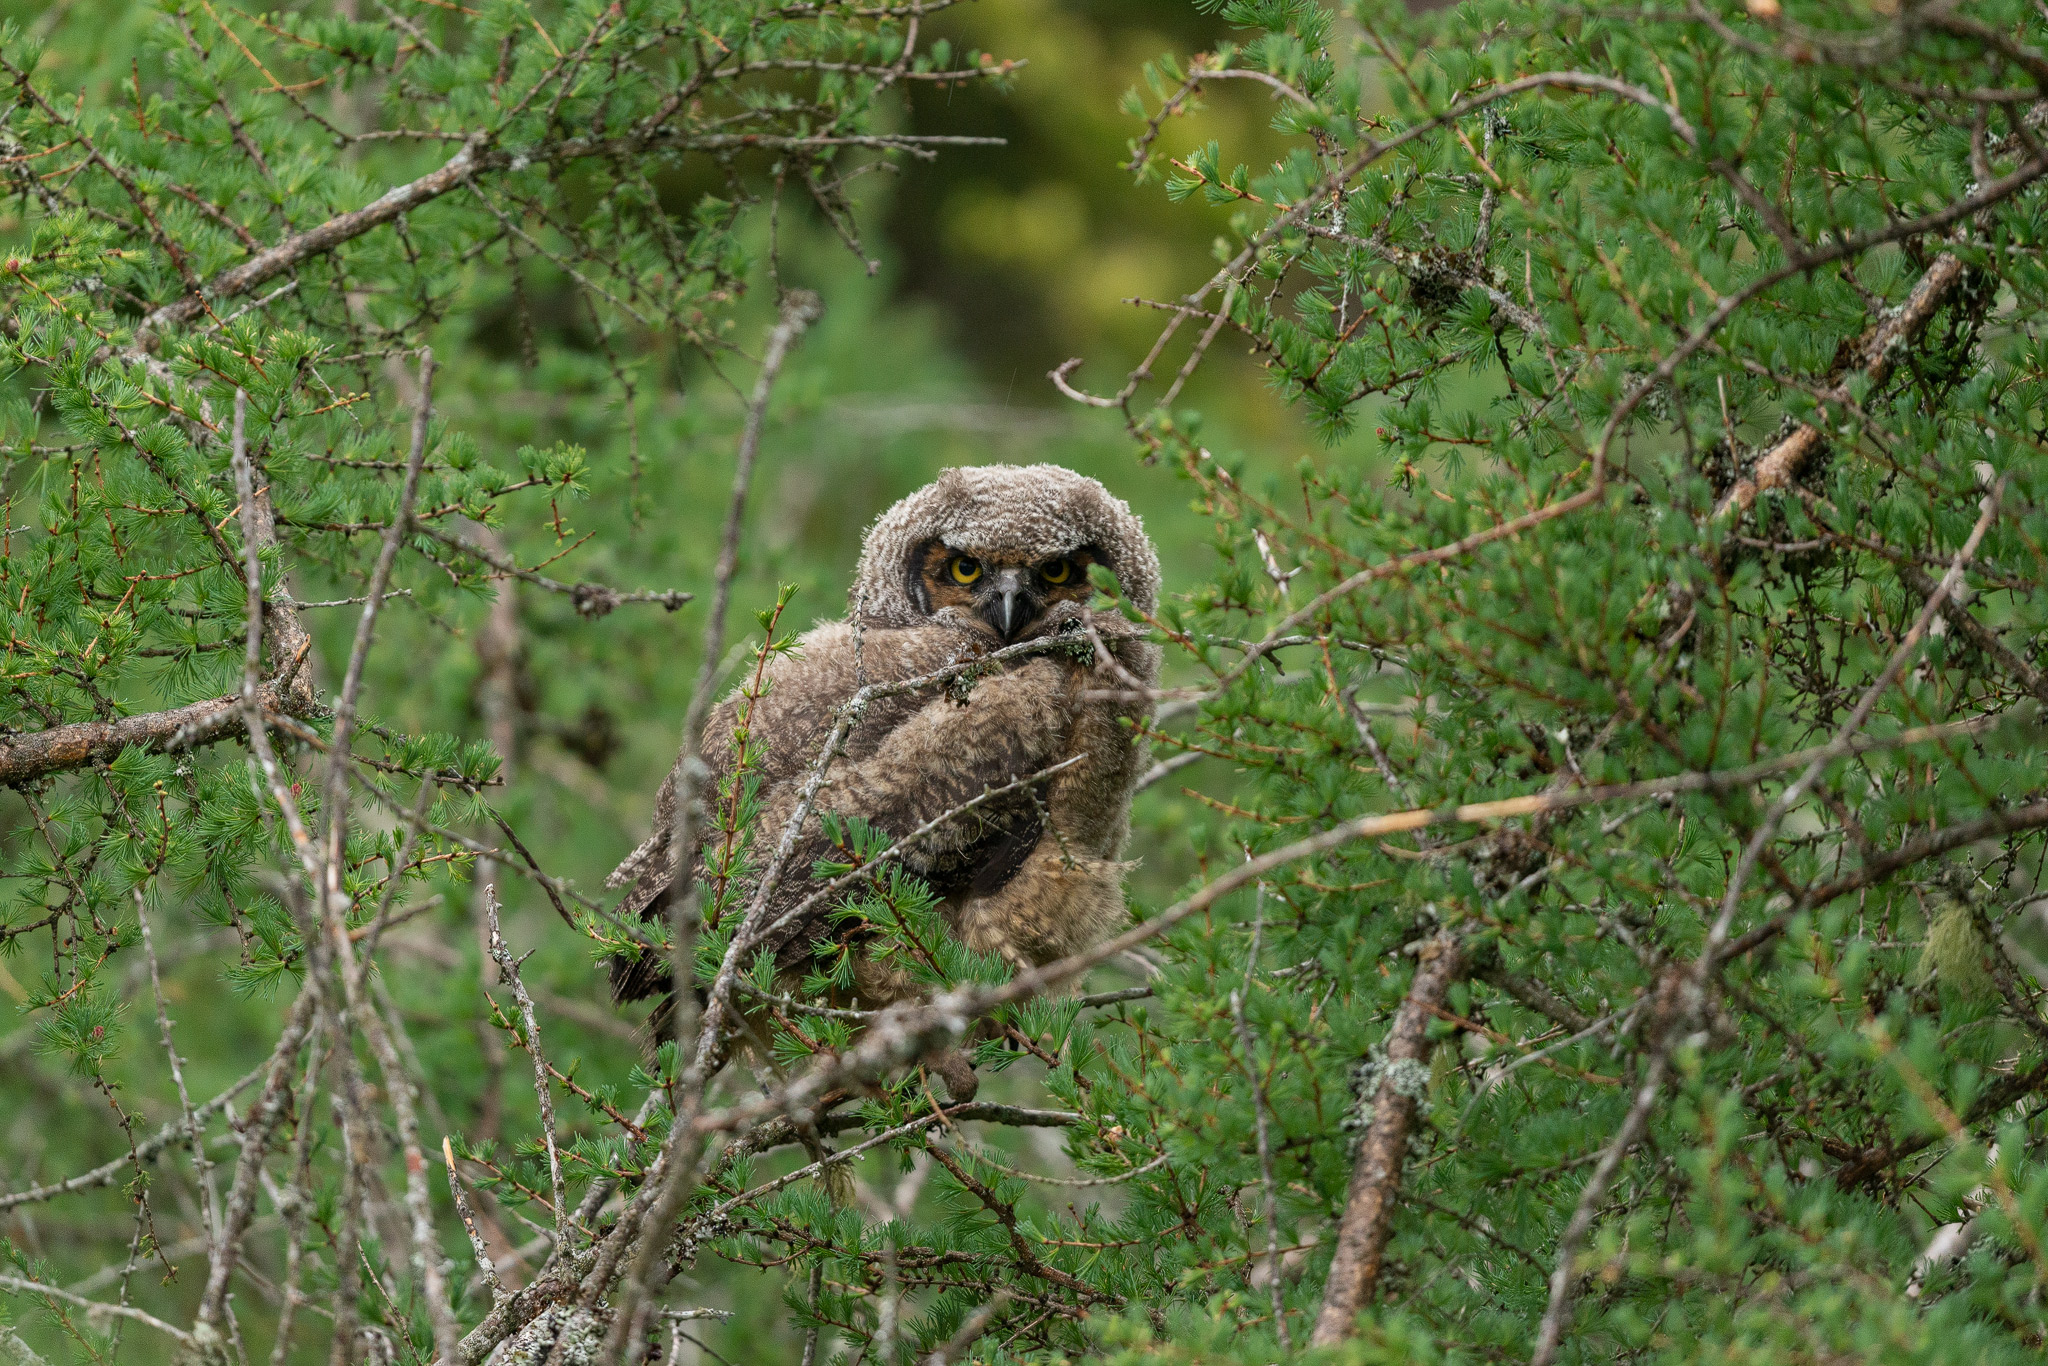
Number 2 - Background - For me this is often were an image is made or broken. You can have the most beautiful subject in front of you and even in amazing light..but if the background is too busy, too “in focus” and distracting then the image is lost in my eyes. Take for example this young Great Horned Owl fledgling. Now this is an extreme example as we have foreground twigs that are causing most of the distraction but either way without them there the background is still not interesting…
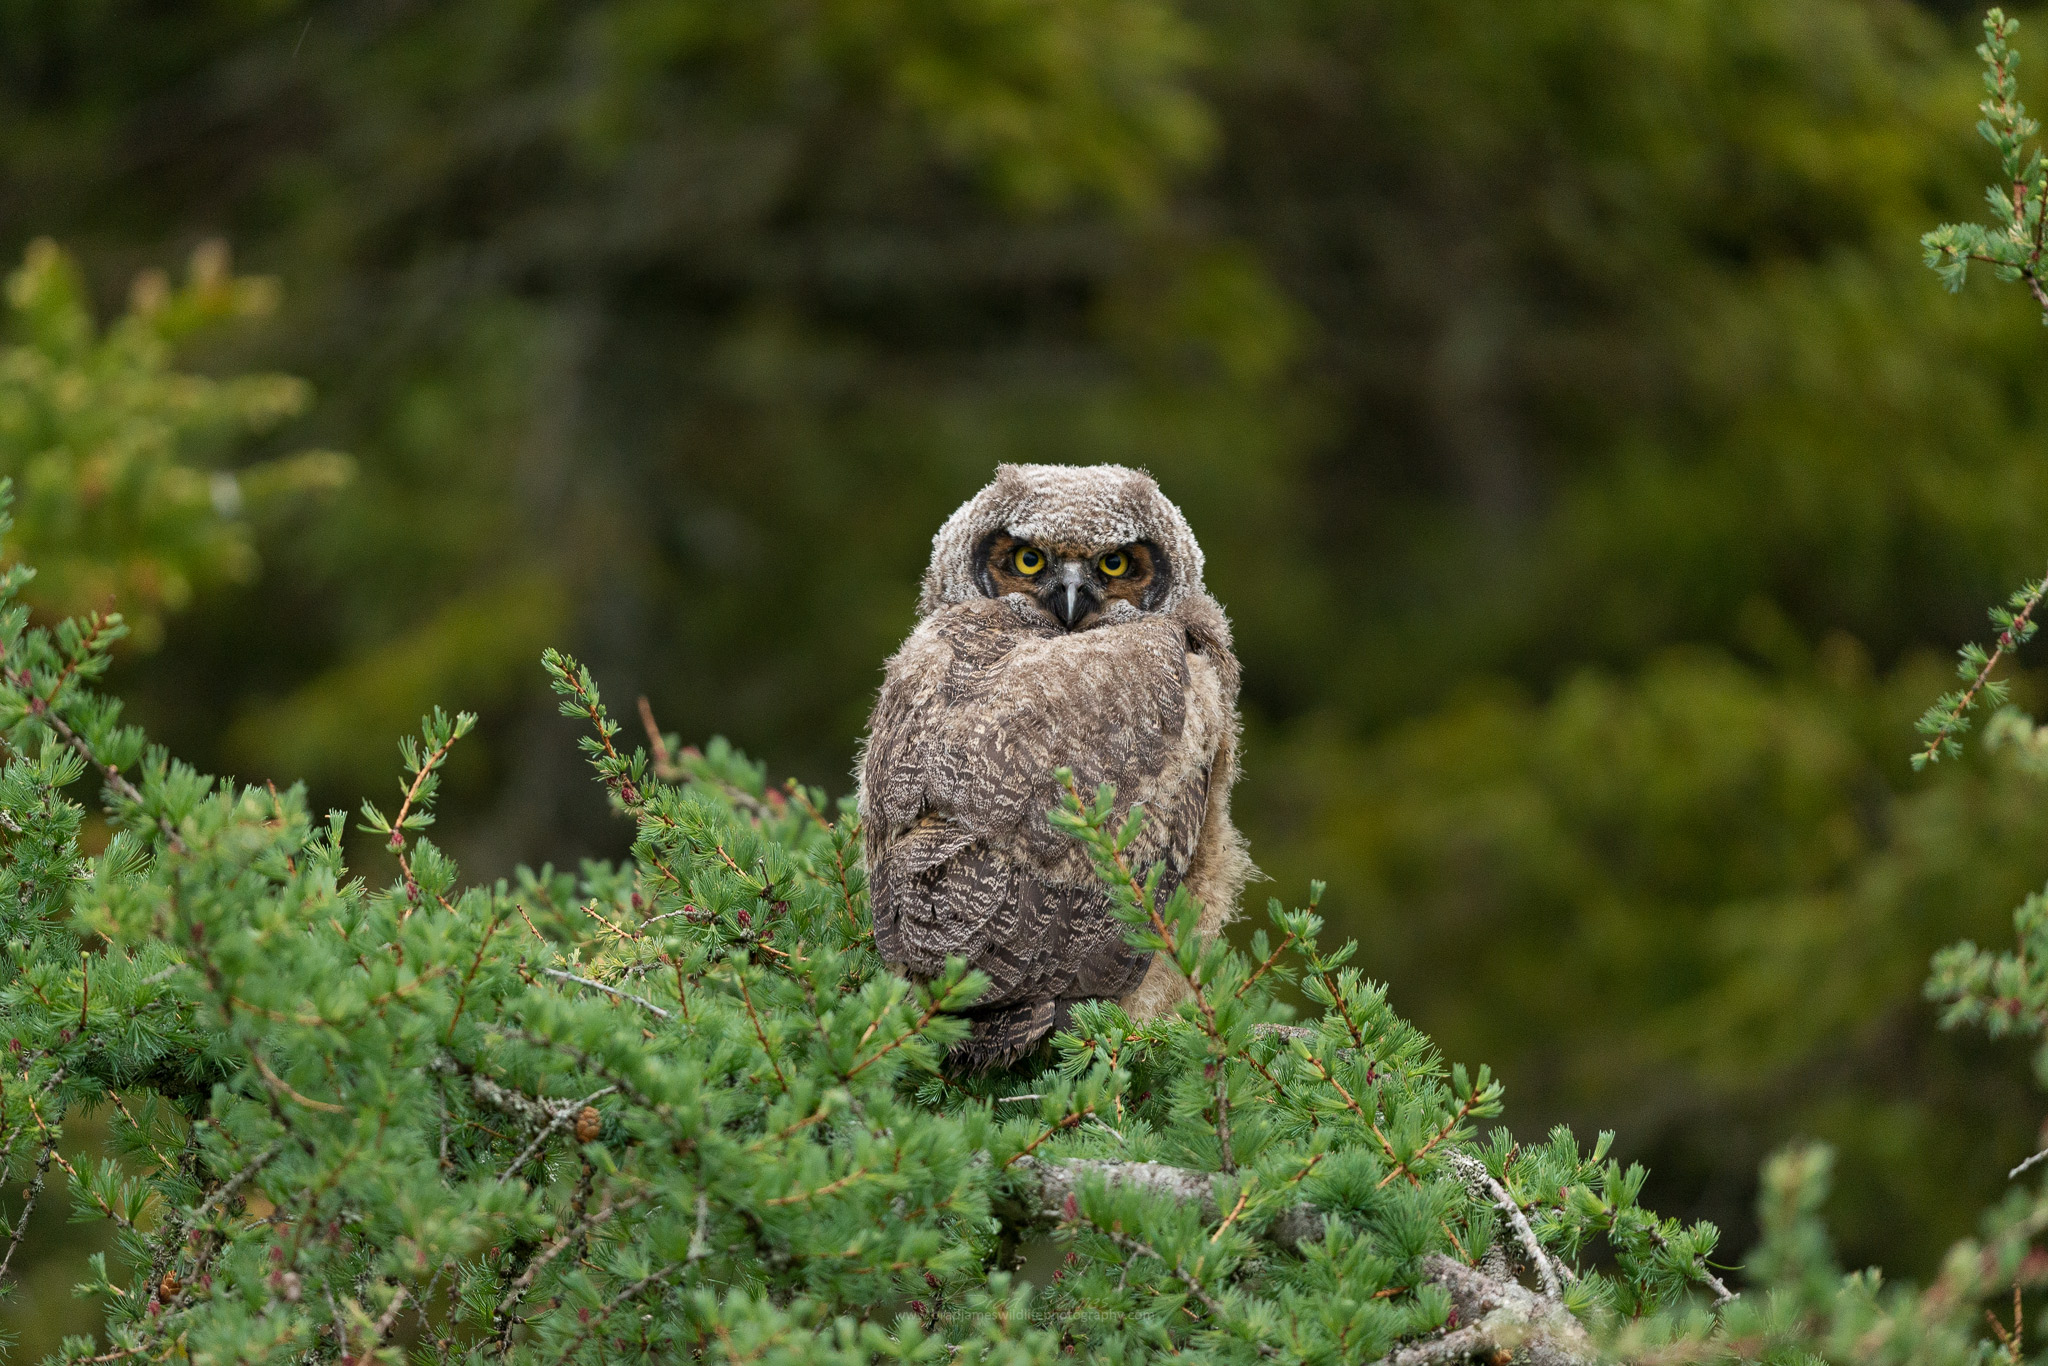
Yet just by moving a few feet to the left of the bird I was able to frame it up with a much cleaner background and of course foreground.
I have become so focused on background over the past two years that now when I approach a subject I am more focused on the background then the actually subject. I tend to look for an area behind my subject that is distant, fairly “clean” and containing complementing colors if possible. I tend to try to stay away from blue skies but then again a blue sky does complement certain subjects nicely.

Number 3- Foreground Blur - This is an area I have to admit I don’t use all that often but I plan to try to incorporate it into my photography more. So what do I mean by foreground blur? What I am referring to is using something within the environment you are shooting in to create a nice soft foreground feel to your image. This technique is often used to help remove or hide otherwise boring or distracting foreground elements. For example in this image of a Black & White Warbler I positioned my lens in front of a near by branch to create this nice out of focus blur to hide the bare twigs between myself and the subject.

It can also be used to help take your image in a more artistic and creative way.
In order to get the best results from this technique look for an object that is between you and your subject but that is closer to you. Then focus on your subject and slowly lower your lens behind the object you selected to create the blur. Since the object is closer to you and your camera is focused on your subject the object is completely out of focus and hence creates a blur in front of your lens..
In the image below I laid my lens completely on the ground using the foreground foliage to create this nice soft feel.

Here is an example of the area but I was slightly elevated. Hence the not so clean looking image and also a great example of why laying completely flat on the ground is much better. The shot below was taken from the seated position.

Number 4 -Study Light - This past year or so I have dedicated a lot of time to studying light and how it affects many of my favorite shooting locations. Getting to know exactly where the sunrises and falls in an area can help you position yourself to create/capture more unique and interesting photos. Like this back lit Greater Yellowlegs

Try new lighting angels instead of the common “sun at your back” shooting style and let the light highlight the features of your subject in a different way. Visit the same locations at various times of the year and day to see if the light is different.
Take for example this shot of a Great Scaup taken at Quidi Vidi Lake. During certain times of the year the sun rising over the ridge to the east of the lake strikes the windows of a distant house on the adjacent hill. Then is reflected in the water for roughly 15 mins before the sun is too intense.

Using apps like Photographer’s Ephemeris can aid in gathering information about the sun direction at different locations during different times of year.
Number 5 -Envision Your Shot - We often hear people say “oh you are so lucky to have captured that image” or “Luck must have been on your side to get this”. And I do have to agree luck does play a part but I believe envisioning your shot plays a larger role. Having a set image in your mind starts the ball rolling on breaking down what YOU need to do to make that image happen. Whether that means checking your local weather station for the right sunrise/sunset conditions or heavy snow/rain to add more interest in your shot.
Here is an example of an image I captured lately of a Tufted duck taken at Bowring Park.

I had this image in my mind for a while and I knew I had to find a location that would allow me to be elevated above the ducks. It wasn’t until my daughters first Christmas Bird count at the park did I realize it would be the perfect location for this shot. So the following weekend I headed out and attempted to capture what I had envisioned (the heart shape in the water was a bonus, I cant say I envisioned that lol)
Here is another example of a Red Fox from this past spring.

When I found out about this fox family at Cape St. Mary’s I knew I wanted to capture an image of one of the parents right at sunrise. Since this location is a wide open tundra I knew I would get the first rays of morning light. Lucky for me the day after finding out about the foxes was a clear day so I knew this image could be possible. Moments after feeding her kits their morning breakfast she curled up and watched the sunrise over the horizon allowing me to capture the image I was after.
In Wildlife Photography there will be very few times that you will walk out your front door, head to a random location and nail a stunning image. Those images are the lucky ones..the rest will be because you envisioned the shot and put yourself in the right place at the right time. I hope you find these tips useful and the great thing about them is that they cost nothing to implement. Its all a matter of practice and putting in the hard work.
If you haven’t signed up yet to my Newsletter I invite you to do so at the top of the page. My Newsletter contains bonus photograph tips, any upcoming deals on my eBook and It is also a great way to be notified when I post new content.